

Introduction
Are you a proud Mac user who loves to capture those memorable moments on your screen? Well, you’re in luck because we’re here to guide you through the wonderful world of screenshots on Mac! Whether it’s capturing an entire webpage, a specific area, or even just that pesky error message for tech support, we’ve got you covered. In this step-by-step guide, we’ll show you not one, but three different methods to screenshot on Mac. So grab your keyboard and get ready to become a screenshot pro in no time! It’s time to unlock the power of capturing those precious pixels with ease. Let’s dive right in!
Method 1: Using the Keyboard Shortcuts


Capturing screenshots on a Mac is as easy as pressing a few keys on your keyboard. With the built-in keyboard shortcuts, you can quickly capture different areas of your screen without any hassle.
The first method involves using specific key combinations to take screenshots. For instance, by pressing Cmd-Shift-3, you can capture the entire screen in one go. This is perfect when you want to grab everything that’s currently displayed on your monitor.
If you only need to screenshot a specific area, simply press Cmd-Shift-4 and then use the crosshair cursor to select the desired region. It gives you more control over what gets captured and allows for precise cropping.
To capture just a selected window or menu, press Cmd-Shift-5 instead. This option lets you single out particular windows or dropdown menus that might be important for sharing or troubleshooting purposes.
These handy keyboard shortcuts make capturing screenshots on your Mac quick and efficient, saving you time and effort in documenting information or sharing visuals with others.
Cmd-Shift-3: Capturing the entire screen
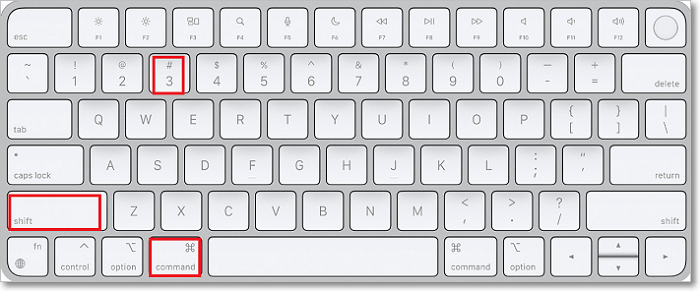

Capturing the entire screen on your Mac is a breeze with the handy keyboard shortcut, Cmd-Shift-3. It’s perfect for those times when you want to capture everything that’s currently displayed on your screen in one shot. Whether it’s a stunning landscape or an important document, this method has got you covered.
To use this shortcut, simply press and hold the Command (Cmd) key and then press Shift and 3 simultaneously. You’ll hear a satisfying camera shutter sound, indicating that your screenshot has been successfully taken. By default, the screenshot will be saved as a PNG file on your desktop.
Once captured, you can easily access your screenshot by navigating to your desktop or using Finder to locate the file. From there, you can open it in any image editing software of your choice or share it directly with others via email or messaging apps. Capturing the entire screen has never been easier!
Cmd-Shift-4: Capturing a selected area
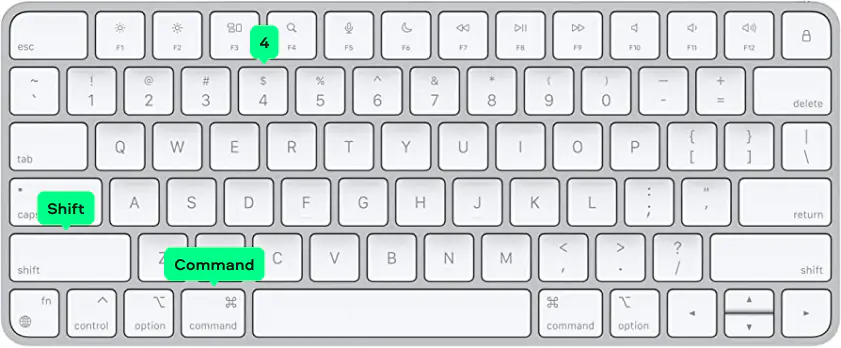

Capturing a selected area on your Mac screen is made easy with the Cmd-Shift-4 keyboard shortcut. This method allows you to capture only the portion of the screen that you choose, giving you precise control over what you want to capture.
To use this feature, simply press Cmd-Shift-4 and then drag your cursor across the desired area. A semi-transparent overlay will appear, indicating the area being captured. Once you release the mouse button, a screenshot will be saved as a file on your desktop.
This method is perfect for capturing specific sections of web pages, documents, or images. Whether it’s an important paragraph in an article or a funny image from social media that caught your attention, using Cmd-Shift-4 ensures that you get exactly what you want without any unnecessary clutter. So go ahead and give it a try!
Cmd-Shift-5: Capturing a selected window or menu
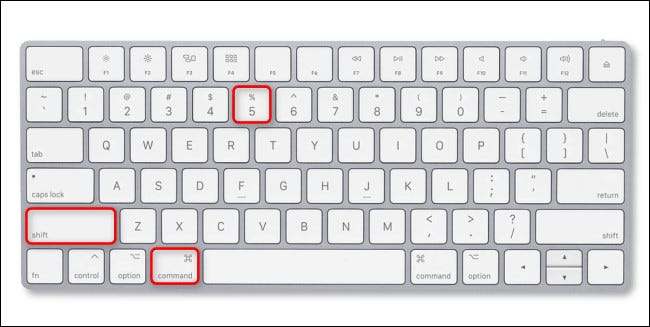

Cmd-Shift-5 is a nifty keyboard shortcut on your Mac that allows you to capture a selected window or menu effortlessly. Whether you want to save an image of a specific application window or quickly grab a screenshot of a dropdown menu, this method has got you covered.
To use this feature, simply press Cmd-Shift-5 and observe the toolbar that appears at the bottom of your screen. From there, you can choose whether to capture the entire screen, a selected portion, or just a particular window or menu. With just a few clicks, you’ll have your desired screenshot saved and ready for use!
This method is especially handy when you need to highlight specific elements in an application or share screenshots with colleagues and friends. It saves time by allowing you to focus solely on capturing what’s important without any unnecessary clutter from other parts of your screen. So go ahead and give it a try!
Cmd-Shift-6 (For Touch Bar MacBooks): Capturing the Touch Bar
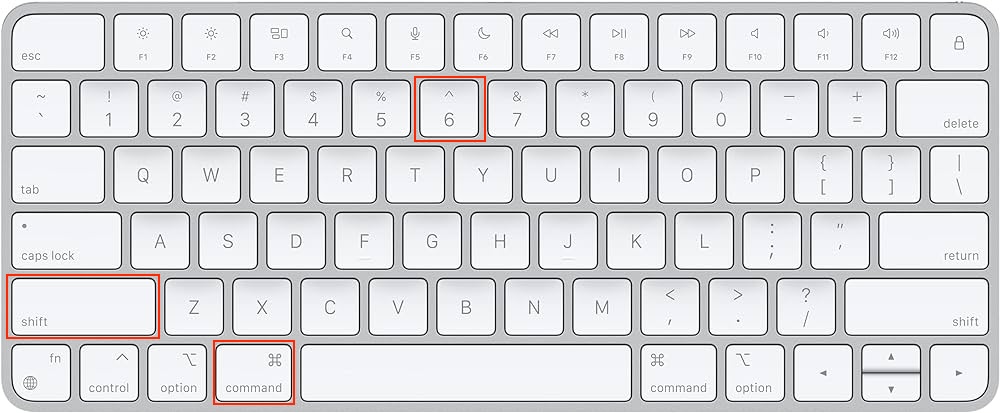

One of the handy features that MacBooks with a Touch Bar offer is the ability to capture screenshots directly from the Touch Bar. This makes it incredibly convenient for users who frequently use this feature.
To capture the Touch Bar, simply press Cmd-Shift-6 on your keyboard. The screenshot will be saved as a file on your desktop by default. You can then view and edit it as needed.
This method is especially useful when you want to highlight specific functions or settings displayed on your Touch Bar. It allows you to easily share this information with others or refer back to it later without any hassle.
Remember, if you have a MacBook without a Touch Bar, this shortcut won’t work for you. But don’t worry! There are other methods available that we’ll cover in this guide so everyone can learn how to screenshot on their Macs efficiently and effortlessly!
Method 2: Using the Screenshot App
- Snagit:Key Features: Snagit offers a variety of capture options, including full-screen, region, and scrolling capture. It also provides advanced editing tools, annotations, and the ability to record screen videos.
- Lightshot:Key Features: Lightshot is a lightweight and easy-to-use tool that allows you to capture selected areas or the entire screen. It includes basic annotation features and allows you to quickly share your screenshots.
- Jing:Key Features: Developed by TechSmith (makers of Snagit), Jing is a simple and free tool for capturing screenshots and screencasts. It’s user-friendly and offers basic editing capabilities.
- Skitch:Key Features: Skitch is part of the Evernote family and provides a range of annotation tools for screenshots. It’s particularly useful for adding arrows, shapes, and text to your captures. However, as of my last update, its development has slowed down.
- Monosnap:Key Features: Monosnap offers screen capture, annotation, and basic editing tools. It also provides cloud integration for easy sharing and storage of your screenshots.
If you prefer a more user-friendly approach to taking screenshots on your Mac, look no further than the built-in Screenshot app. This handy tool offers a range of options and customization features to capture exactly what you need.
To access the Screenshot app, simply press Command + Shift + 5 on your keyboard. A small toolbar will appear at the bottom of your screen, giving you various screenshot options to choose from.
With this app, you can easily capture selected areas, entire screens, or specific windows with just a few clicks. Plus, you have the flexibility to set timers for delayed captures or even include mouse pointers in your screenshots.
The best part? The Screenshot app allows you to preview and edit your captured images before saving them. You can crop, rotate, annotate, and even add text or shapes to enhance your screenshots effortlessly.
So whether it’s capturing an important document or sharing funny moments with friends online – using the Screenshot app is sure to make taking screenshots on your Mac a breeze!
Method 3: Using Third-Party Applications
If you’re looking for more advanced options and features, using third-party applications might be the way to go. There are several great apps available that can enhance your screenshot-taking experience on Mac.
One popular choice is Snagit, which offers a wide range of editing tools and allows you to capture screenshots with just a few clicks. Another option is Skitch, which not only captures screenshots but also lets you annotate them with arrows, text, and shapes.
For those who prefer a simpler interface, Lightshot is a lightweight app that still packs a punch. It allows you to quickly select an area on your screen and save or share the screenshot effortlessly.
No matter what application you choose, make sure to read reviews and check if it’s compatible with your macOS version before downloading. With these third-party tools at your disposal, capturing screenshots on your Mac will become even easier and more efficient!
Special Tips and Tricks
Saving screenshots in different file formats is a handy trick that can be useful, especially if you need to share your screenshots across different platforms or devices. By default, Mac saves screenshots as PNG files, but you can change this to JPEG, TIFF, GIF, or even PDF. Simply press and hold the Control key before pressing the screenshot shortcut keys (Cmd-Shift-3 or Cmd-Shift-4) to save in your desired format.
Another nifty tip is taking screenshots via the command line. This method allows more control over capturing specific areas on your screen without relying solely on keyboard shortcuts. Open Terminal and use commands like “screen capture -i” for interactive selection mode or “screen capture -R x,y, width,height” for capturing a specific rectangular area.
If you prefer not to save screenshots as files but instead want them copied directly to your clipboard for easy pasting into documents or image editors, there’s a way! Hold down the Control key along with the screenshot shortcut keys (Cmd-Shift-3 or Cmd-Shift-4), and voila! Your screenshot will be ready to paste wherever you desire.
Remember these special tips and tricks when using Mac’s built-in screenshot tools. They’ll make your screen-capturing experience even more efficient and tailored to suit your needs seamlessly.
Saving screenshots in different file formats
Saving screenshots in different file formats is a great way to customize your captured images. With Mac, you can save your screenshots in various file formats such as PNG, JPEG, TIFF, and more.
PNG format is perfect for preserving image quality without compression. It’s ideal for capturing screenshots with text or graphics that need to be displayed clearly. On the other hand, if you want smaller file sizes and don’t mind some loss of quality, JPEG is a good option.
If you’re working with professional software or require high-quality images for print purposes, TIFF format might be your best choice. It supports lossless compression and maintains all the intricate details of your screenshot.
Experimenting with different file formats allows you to find the one that suits your needs best. So go ahead and explore these options to make sure every screenshot looks just the way you want it!
Taking screenshots via the command line
Taking screenshots via the command line can be a handy trick for those who prefer using keyboard commands over mouse clicks. It allows for quick and efficient screen captures without having to navigate through menus or use external applications.
To take a screenshot via the command line on your Mac, open the Terminal application and type in the appropriate command. The basic command to capture the entire screen is “screencapture”, followed by the desired file name and location. You can also specify options such as capturing a selected area or window.
Using this method gives you more flexibility and control over your screenshots. Plus, it’s great for automating tasks or including screenshots in scripts. So if you’re comfortable with using commands, give taking screenshots via the command line a try and see how it simplifies your workflow!
Copying screenshots to the clipboard instead of saving as files
Copying screenshots to the clipboard instead of saving as files is a handy trick for those who want to quickly paste their captures into other applications. With this method, you can skip the step of manually saving the screenshot as a file and directly copy it to your clipboard.
To do this, simply follow these steps:
1. Capture your desired screenshot using any of the methods mentioned earlier.
2. Instead of pressing “Save” when prompted, press and hold the Control key while clicking on the captured image thumbnail.
3. From the drop-down menu that appears, select “Copy [screenshot type]” (e.g., “Copy Full Screen”).
By choosing this option, your screenshot will be instantly copied to your clipboard without being saved as a file. You can then paste it into an email, document, or any other application where you need to use it.
This feature is particularly useful if you frequently need to share screenshots or include them in presentations or reports without cluttering up your desktop with numerous saved files. Give it a try and streamline your workflow!
Conclusion
Capturing screenshots on your Mac is a breeze once you know the tricks. Whether you prefer using keyboard shortcuts, the built-in Screenshot app, or third-party applications, there are multiple ways to get the job done.
By utilizing the various methods outlined in this guide, you can capture the entire screen, a selected area, a specific window or menu, and even the Touch Bar on MacBook Pro models equipped with it. And don’t forget about some of the special tips and tricks we mentioned along the way.
Experiment with different file formats for saving your screenshots or try taking them via command line if that’s more up your alley. You can also choose to copy screenshots directly to your clipboard instead of saving them as files.
With these tools at your disposal, you’ll be able to effortlessly capture and share important information from your Mac screen whenever necessary. So go ahead and start screenshotting like a pro!
Remember: practice makes perfect when it comes to mastering any new skill. So don’t hesitate to experiment with different techniques until you find what works best for you. Happy screenshotting!
Support authors and subscribe to content
This is premium stuff. Subscribe to read the entire article.